Tubeless tyres are the latest innovation in the endless fight of the cyclist against punctures.
When the wheels on my second best training, commuting and pub visiting bike looked like they needed replacement I decided to take the opportunity to build up some wheels suitable for tubeless
Getting all the bits and pieces involved was quite a job. I got parts from Star bike in Germany, http://www.starbike.co.uk, Spa Cycles in Harrogate http://www.spacycles.co.uk, AllTricks in France http://www.acycles.co.uk and High on Bikes of Southport http://www.highonbikes.com
I got all of the bits delivered to work which lead to my first problem, getting the rims back home

getting the new rims back from Bristol
The rims are Son H Plus Archetypes These rims have a good reputation for being strong, they are only moderately expensive and quite pretty. The only downside I can see now they are on the bike is that the braking surface is andonised and doesn’t seem as effective at brake gripping as a machined surface.
For the rear I bought a new Ultegra Hub. The old 105 hub has a few miles left in in but has seen better days.

New rear wheel, laced up
Once the rear was built I was having a go at fitting the tubeless tyres. The system is quite different to the tyres I’ve used before. There is no inner tube just a tight fitting outer tyre, air tight tape and sealant

Bottle of Isoproyl
The tape goes across the top of the holes for the spoke attachments. To clean the inside of the rim to ensure good adhesion Isoproyl alcohol is used.

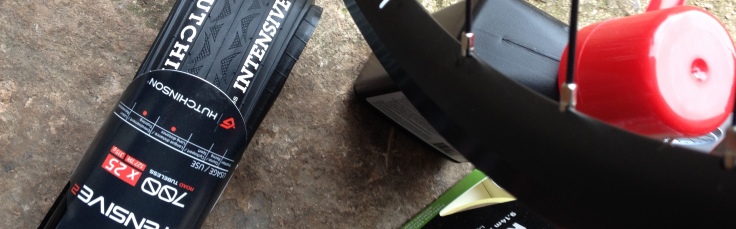
New tyre and conversion kit
The tyres I was using were Hutchinson Intensive and the tape and sealant is a kit made by Stan’s Tubeless. Both of these are market leaders in tubeless. There isn’t so much choice in tubeless tyres as in clinchers but the Hutchinson Intensive seem the best choice for winter riding and lots of miles. When they are fitted they are actually narrower than 25mm. Even on the wide 23mm rims they measure 24mm.

Fitting the tyre
Fitting the tyre is not easy, as the super strong bead to prevent air leaking is difficult to slip over the rim

Bead Jack Instructions
I got a special tool to assist with this tyre fitting ,challenge, a Kool Stop “Tyre Mate” which is a type of “bead jack”

Using the Kool Stop Tyre Mate bead jack on the last bit of tyre

Using the soap spray
After the tyre is fully mounted the next difficulty is to inflate it. Normally with clinchers the inflating step is easy with a track pump. However, with tubeless it’s necessary to spray the tyre with soap solution so that the bead can slip into position easier and to use either a compressor or a CO2 cartridge to suddenly supply a massive amount of pressure to pop the tyre into place.
Before doing this it is necessary to remove the valve core and to add some sealant, which is a latex based rubber solution. On the rear wheel this was easy, I used the official Stan’s injector.

Complete rear wheel

pulling the old front wheel apart
I am reusing the front hub. It is a Shimano generator hub and in good condition.
After I’d built the front wheel, it was time to fit another tubeless tyre. This time inserting the sealant was not as straight forward. The valve core appeared to clog with the sealant, the injector sprayed it all over the wheel building stand and eventually I had to remove part of the tyre to get the sealant in
At this point I have two new wheels with tubeless rim tape and tubeless tyres installed. Both wheels also have sealant in them.
I was aiming to get the 25mm tyres inflated to a modest 90 psi (6 bar). They were not initially too successful at holding this pressure. Overnight the pressure would drop to 40 psi. However, I did use them for a couple of short trips.

The finished wheels on the bike
So I tried to address the problem of getting the tyres to hold a workable pressure. The tyres are rated at over 100 psi but are only managing to hold less than half of that pressure
I tried adding some more sealant to the rear tyre. It had approximately double the recommended amount in it. This did not work but when the tyres were pumped up to over 90 psi, sealant could be seen leaking from the nipples. This indicated that the tape covering the holes inside was not working correctly. Fortunately I had a spare reel of wide (21mm) tape. I’d bought this half thinking I might need to add more. But not having done this before….Anyway, I added two more layers of the wider tape and it worked. Overnight the pressure holds at 80psi+. It’s a usable bike again.
Some people have suggested to me that it was a mistake not using a “tubeless specific” rim. But the Son HPlus Archetype is said to be “tubeless friendly”. It is a wide 23mm external width rim and as you can see from the picture a similar profile to the leading Stan’s rim.

Stan’s Alpha and Son H Plus Archetype comparison. Approximately to scale
I would guess that the Stan’s rim is easier to mount tubeless tyres on but once the tyre is mounted it’s the same
The only real problem I had was with the Stan’s conversion kit and the so called “universal” tape. This is only 12mm wide and I would guess it would work fine with some rims. Or if it was layered in a slightly different way. I did apply it to the wheels “by the book” ( or by the youtube video to be more exact!) I suppose there is no incentive for Stan’s to sell conversion kits with accurate advice on what to do with different rim types as they sell their own rims. If people believe that Stan’s Alpha Rims “work best” with tubeless then they will sell more of them.
My experience is, for Son H Plus Archetypes, don’t use the 12mm universal tape. Get some 21mm tape instead.
Other lessons learnt: I wish I’d built a compressor with a plastic 1 litre Coke bottle (google it if you are interested) as I used up most of my stock of CO2 cartridges
Look forward to using the nice new wheels on some long rides soon!

The H plus Son archetype doesn’t have a flat surface (in section) for the tyre bead to seal on. The Stan’s does (as do my Campag 2-way-fits).
I wonder if that’s a problem? The ramped section of rim towards the edges tends to make the bead slide inwards if pressure drops?
By: Matthew Hardy on November 7, 2015
at 9:12 am
Matthew, I doubt that this is the whole story as the tyres are now mounted properly on the rims and hold pressure just fine! It’s my impression that the intention of the flat section is to respond better to burping
By: audaxing on November 7, 2015
at 9:43 am
Jamie
How are you getting on with the Archetypes and tubeless?
I run tubeless on my carbon summer bike (Stans Alpha 400 rims+Shwalbe One) and ‘cross bike (Velocity A23 rims+Mud Wrestlers) with some success. I’m thinking of making the change on my winter/audax/tourer which has Archetype rims… with Sector 28s.
Any updates ‘in use’ would be useful.
By: Martyn on November 28, 2015
at 7:56 pm
Martyn,
Doing just fine been riding a lot on the bike did a 200k not long ago and 150k today plus commutes plus trips to pub
Wheels/tyres just fine
By: audaxing on November 28, 2015
at 10:13 pm
[…] Here’s my previous article about Going tubeless […]
By: tubeless update | Audaxing on January 17, 2016
at 11:20 am
Hi there. I am looking to do the same thing with a set of Archetypes that I’ve recently acquired. What is is your weight and what pressures do you normally run? Any issues so far? How miles or km do you have on this setup?
Thanks
By: Phuc Huynh on May 12, 2016
at 3:30 pm
1) weight/pressure: I weigh 85kg, run at 90 psi
2) Issues. Once I’d done the stuff outlined in the article was ok until last month. Then had three flats that would not seal – the holes were too big. Partly due to the weak tyres, partly the sealant drying out
3) distance 2200km
By: audaxing on May 12, 2016
at 3:48 pm
Using a Lezyne High Volume track pump, I was able to seat my tubeless MTB tyres easily on non-tubeless rims. I’m hoping to be able to do the same when I get around to going tubeless on my CommuTourAx bike.
By: Scott Church on December 2, 2016
at 12:58 pm
I assume you mean a “Lezyene Pressure Overdrive” like this http://www.lezyne.com/product-fpumps-hv-pressovrdrive.php
I won’t go into all the details here but please don’t try and use tubeless on non tubeless rims without under standing all the risks
Stuff that works well at low pressure on MTB wheels doesn’t translate to the high pressures on road wheels!
By: audaxing on December 2, 2016
at 1:38 pm
I like my H PLUS SON Archetype rims. Much better than the several Bontrager rear rims I tore to bits. 32 spokes help, I s’pose.
My only criticism is that the spoke holes tend to let in water and grit. The triangular section leaves gaps at the side of the valve and nipples. If you notice creaking from the rear wheel, clean and lubricate the nipples. Some rims have a small drain hole, but H PLUS SON hadn’t come across this issue and couldn’t advise.
By: Bradley Temperley on November 13, 2017
at 7:16 pm