Just got this email
Hi Jamie
It was good to meet up with you at the recent AUK reunion – its always
good to put a face to the name.I was wondering if you could give me some advice about going tubeless.
After another winter puncture on my Langport – Taunton commute I’m
seriously thinking about switching to tubeless tyres but I notice on
the YACF forum and your blog that your experiences haven’t all been
straightforward and trouble free. My main question is am I better
replacing my existing rims for tubeless compatible?I currently have an exal xr-2 32 hole front wheel with an SP hub
dynamo and a Mavic Open Elite on the rear. Getting rid of the exal
wouldn’t be a major problem as it’s a pig for getting tyres on and
off.Any other advice re tyres/sealant etc would be gratefully received.
I hope you have a great Christmas and New Year with plenty of riding.
Cheers Len
I’ve been using tubeless now for a year on two bikes
People are asking me about them, are they good, what’s bad, how to set up?
There still is a lot of poor, contradictory info out there
What’s the problem?
Tubeless tyres are more comfortable and roll fast as they are more pliable
than clinchers.
Tubeless needs all kinds of special preparation for them to work correctly.
Coming from inner tubes + clinchers these rules are odd and difficult
Rim type
Tubeless tyres work on clincher rims. There are special rims for tubeless
but with the correct prep will work well on some old non-tubeless rims.
Tubeless rims have a different profile shape to old normal clincher rims.
In theory, any rim can be used. In practice with old, narrow, non-tubeless
specific rims have some risk of the tyre coming off during stress such
as cornering To use a non-specialist old style rim with tubeless, use a
“rim strip” to convert the shape of the channel in the rim.
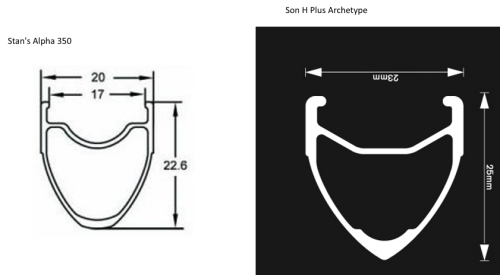
Stan’s Alpha and Son H Plus Archetype comparison. Approximately to scale. Stan’s is true tubeless and Son isn’t
Sealant
As the tyre is a single layer using sealant is more straight forward and
less messy. To install the sealant the easiest method seems to be to
remove the valve core and use a syringe to squirt it in. The weight of
the sealant is slightly less than the weight of an inner tube. It is
extremely effective against very small holes.
CO2 inflators are difficult to use. If the icey temperatures hit the sealant then it doesn’t do it any good. Probably best not to use them except for emergency fixes on the road
Bead jack
Putting the tyre on is not necessarily easy.
I know a lot of bike users complain about how difficult it is to put
on a normal tyre. But the super tight bead on a tubeless tyre puts in
in another league. With normal tyres I have usually got them on with
the shoe trick and a bit of gumption. With tubeless, a special tool,
the bead jack, is required. This is a lever which hooks onto the tyre
bead and the opposite rim.
Even initially clipping a single bead of the tyre over the edge of one rim lip
can be very difficult without the special tool
If the tyre has to be removed then this is almost as difficult. 3 steel
tyre levers and a screwdriver works for me. You can imagine the technique
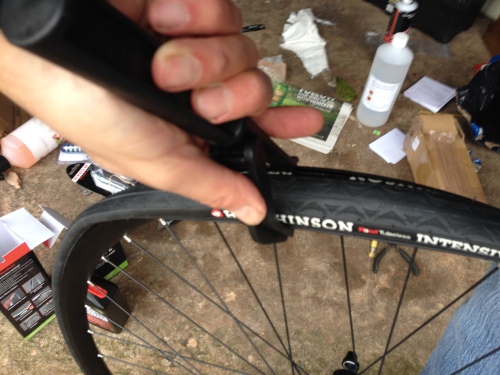
Using the Kool Stop Tyre Mate bead jack on the last bit of tyre
Compressor
The way that the tyre seals onto the rim so that the air does not escape
is very tight. To get the tyre into this state of tightness requires
more than just pumping up the tyre with a track pump. The method that
Stan’s No Tubes (market leader) recommend is
- put tyre on ( this isn’t easy: see above )
- spray soap solution into the gap between tyre and rim
- apply a compressor, not a hand pump as the air supply
After this hopefully, there is a sudden clunk and the tyre will jump into a
good seated position. In practice, I initially used a CO2 inflator( this is a very bad idea, the CO2 destroys the sealant), tried to make a “ghetto compressor” but failed and then bought an “Airshot” which is like the “ghetto compressor” but made of metal, by engineers and not out of random junk

airshot compressor substitute
About the sealant
With the sealant in them the tyres are truly puncture resistant with
the following limitations
Small holes are sealed instantly and the problem is usually not even
noticed! This is truly fabulous. Sometimes a small hole seals but the tyre has
very much reduced pressure and the tyre needs pumping up.
Larger holes are more of a problem. A “larger” hole
(bigger than 2mm) will spew out a lot of sealant. Stop riding, rotate the
tyre so the hole is near the bottom, more sealant will flood out!
Quickly put your finger over the hole. With the added finger pressure
and the reduced air pressure in the tyre, hopefully the leak will stop. Wait a few minutes for the sealant to set, then limp home with reduced pressure. Attempting to
re-inflate to the usual pressure might work for a moment or two but
usually the hole will reopen.
Sealant doesn’t last forever. It very gradually dries out onto the tyre surface. Also any “micro punctures” use a small amount. So it needs topping up every 2-3 months
Fixing punctures
If the tyre does get a hole larger than the sealant can cope with, it
has to be sealed in some other way. There are a number of “external”
puncture kits which are supposed to be able to seal large holes without
removing the tyre. To cut a long story short, these kits do not work
with road tyres. Partly this is because the kits can’t cope with the
pressure of an inflated tyre and partly because they add a bump to the
outside on the smooth casing. To fix the puncture, remove the tyre and
install a patch on the inside. Usually, inner tube patches are fine but
there are tubeless specific internal patch kits available
Topping up the tyre pressure
Some people have reported that tubeless tyres lose pressure faster when the bike is just sitting in the garage. I’ve experienced this, sometimes having to pump up again before every trip out. However, there is a way to stop this. In every case where I’ve had this happening, adding more sealant made it better. I believe that most of my tubeless bikes need a little more pumping to top up the pressure before use but it’s not a big deal once the sealant is in. Maybe I’d have to do them twice a week and the clincher bikes once every two weeks. But if you are in a hurry the tubeless tyres ride ok with a much much lower pressure than is optimal
Non Standard rim/tyres compatibility
Some tyres are listed as not working on hookless rims. Some do. The width of rim that tyres will work with is much more restrictive than with clichers. This is when using tubeless compatible rims with tubeless compatible tyres!
The terrible expense
Given that the advantages are not clear-cut, the additional cost of
tubeless is worth considering. The cost factors are
Tyre cost
Typically in the UK quality clinchers are a few pounds cheaper than
tubeless. Even with the extra cost of an inner tube, clinchers much
cheaper. Also, at the time of writing, tubeless tyres are rarely in the
bargain bin
Sealant cost
The Stan’s stuff (or the Schwalbe rebadge of it) is effective
but expensive. It needs to be used every 3 months. It is possible to use diluted tractor tyre sealant if you want the super low-cost version!
Valves
Yet another fiddly specialist part that is overpriced
Rims and wheels
There is still a premium on these for tubeless
Extra tools
You will need a bead jack, a compressor or equivalent and optionally a syringe for sealant and a valve core remover
The MTB factor
When I describe the various problems I’ve had inevitably someone with
an all terrain bike says that they don’t have those problems and my
reservations with the tubeless system don’t fit in with their experiences.
MTB tubeless has some advantages over road bike tubeless
– MTB tubeless has been around longer. So there is a wider choice of
tyres and rims.
– MTB tubeless runs at lower pressure. The sealant works better and
MTB users actually want a super low pressure which only tubeless tyres
can achieve. OTOH Road bike users need a pressure of at least around
50 to 70 psi (3 to 5 bar) in order to get optimal rolling resistance
– MTB makers have standardized the wheel/tyre combinations to some extent
– External patch kits work. As the tyres are knobbly and work at a lower
pressure the problems with road tyres do not apply
Supposed advantages of tubeless that aren’t
lower weight
Tubeless tyres are usually heavier in construction than clinchers and
contain sealant. So overall the weight advantage is tiny. But it is real
and it’s a “rotating weight” advantage at the outer edge of the wheel.
It’s a small plus, not an amazing advantage
running lighter tyres in the winter
The idea goes: the sealant means that the tyre is immune to punctures.
Light tyres puncture in the winter but with the magic of tubeless
somehow punctures don’t matter. Unfortunately (as discussed above) the bigger holes do not effectively seal.
You need fewer tools on the road
Again, this is mainly due to the supposed invulnerability of tubeless
to punctures. But if you really do have to fix a tubeless puncture on
the road you will need a bead jack and some way to reseat the tyre- good luck
tubeless tyres are “fit and forget”
Except for the topping up of sealant, more pumping up and the need for lots of specialist
tools and equipment
You asked…
Do I need to replace the rims to run tubeless? No. But you will need a rim strip.
You kinda implied that running tubeless will lead to less punctures and generally a more jolly time. It might, hopefully your bike can run tyres bigger than 28mm. If it can, this has the double advantage that more “winter suitable” tyres are available (Marathon Supreme, Schwalbe G1 Speed, Hutchinson Sector, Vittoria Adventure) and that they can be run at lower pressures so the sealant works better. I’ve run Schwalbe S1 30mm, Specialized 2bliss 32mm, Schwalbe Marathon 50mm and Vittoria Adventure 38mm with good results
If you want an easier solution to the “no punctures” problem then Schwalbe Marathon Plus weigh too much, ride like lead and have no grip but can be ridden through broken glass with impunity. These tyres aren’t tubeless!
update this article has quite a lot of good, further information in it https://thecycleclinic.co.uk/blogs/news/living-with-tubeless-tyres

As an update I now have a third bike with tubeless on, it’s a Surly Karate Monkey with Velocity Blunts. Blunts are a true tubeless rim. I have put 35mm Marathon Supreme TLR tubeless on them and I’m riding my short commute most days on these.
By: audaxing on February 7, 2017
at 11:28 am